一、Vue高阶
1、路由守卫(Route Guard)
路由守卫(拦截器)
在Router中的一些钩子函数,用于在导航到某个路由前或者离开当前路由前进行一些拦截和处理。
全局路由守卫
会影响所有路由
- beforeEach函数会在导航到每个路由之前被调用,可以用来进行路由拦截和权限控制;
- beforeResolve函数会在导航到每个路由之前被调用,但是在所有组件被解析之后,可以用来进行异步数据加载;
- afterEach函数会在每个路由渲染完成之后被调用,可以用来进行路由完成后的一些操作。
import Vue from 'vue'
import VueRouter from 'vue-router'
import HomeView from '../views/HomeView.vue'

Vue.use(VueRouter)

const routes = [
    {
        path: '/',
        name: 'home',
        component: HomeView
    },
    {
        path: '/about',
        name: 'about',
        component: () => import(/* webpackChunkName: "about" */ '../views/AboutView.vue')
    }
]

const router = new VueRouter({
    mode: 'history',
    base: process.env.BASE_URL,
    routes
})

//全局路由守卫 前置守卫
router.beforeEach((to, from, next) => {
    console.log('beforeEach,在路由切换前调用')
    console.log('数据来源', from.path)
    console.log('目标位置', to.path)
    //放行函数
    next()
})

//全局路由守卫 解析守卫
router.beforeResolve((to, from, next) => {
    console.log('beforeResolve,异步路由解析完成前执行')
    console.log('数据来源', from.path)
    console.log('目标位置', to.path)
    next()
})

//全局路由守卫 后置守卫
router.afterEach((to, from) => {
    console.log('afterEach,在路由切换后调用')
    console.log('数据来源', from.path)
    console.log('目标位置', to.path)
})

export default router
效果展示:
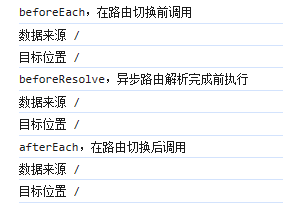
方法有三个参数:to、from、next。
1、to:跳转到的路由对象。
- to.path: 字符串,表示目标路由的路径
- to.name: 字符串,表示目标路由的名称
- to.fullPath: 字符串,表示目标路由的完整路径,包括查询参数和哈希值
2、from:跳转前的路由对象。
- from.path: 字符串,表示目标路由的路径
- from.name: 字符串,表示目标路由的名称
- from.fullPath: 字符串,表示目标路由的完整路径,包括查询参数和哈希值
3、next: 一个函数,调用 next 方法才能继续执行路由跳转。
- next():无参数调用 next 方法表示路由跳转成功,可以继续执行下一步路由跳转或者终止路由导航
- next(false):传递一个 false 表示终止路由导航,即取消当前的路由跳转
- next(path):传递一个路由路径,表示路由跳转到指定的路径,可以是相对路径或者绝对路径
使用全局路由守卫:
sessionStorage是HTML5提供的一种客户端存储数据的方法。它允许在浏览器中存储键/值对,并且只在当前会话中可用。也就是说,只要用户在浏览器中打开当前窗口或标签页,sessionStorage就会一直保留,但在关闭窗口或标签页时会被销毁。可以使用JavaScript的API来访问和操作sessionStorage中的数据。
在router/index中编写路由守卫:
//全局路由守卫 前置守卫
router.beforeEach((to, from, next) => {
    //如果访问的是登录页(to.path= /login)直接放行
    if (to.path === '/login') {
        console.log('登录页')
        next()
        return //结束后续的所有操作
    }
    //如果不是登录页 判断是否登录
    const token = sessionStorage.getItem('token')
    //token如果不存在返回 undefined
    // 0 undefined NaN 都是false
    if (!token) {
        //没有登录 跳转到登录页面
        next('/login')
        return //结束后续的所有操作
    }
    //如果登录了就放行
    next()
})
做登录页:
<template>
  <div id="login">
    <h1>用户登录</h1>
    <div>
      <label>
        用户名:
        <input type="text" v-model="user.username">
      </label>
      <label>
        密码:
        <input type="password" v-model="user.password">
      </label>
    </div>
    <button @click="login">登录</button>
  </div>

</template>

<script>
export default {
  name: "login",
  data() {
    return {
      user: {
        username: '',
        password: ''
      }
    }
  },
  methods: {
    login() {
      console.log('login')
      //模拟用户登录
      if (this.user.username === 'admin' && this.user.password === '123456') {
        //登录 成功 把用户信息存储sessionStorage中
        sessionStorage.setItem('token',this.user.username)
        //登录成功后跳转到home页面
        this.$router.push('/home')
      }
    }
  }

}
</script>

<style scoped>

</style>
注册路由:
{
    path: '/login',
    name: 'Login',
    component: Login
}
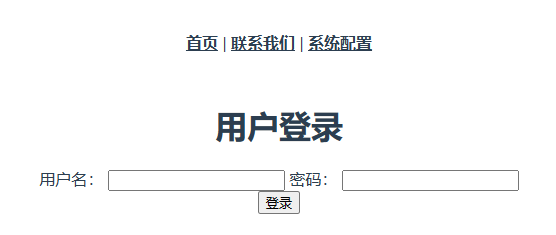
效果展示:
路由独享守卫
只影响特定路由
使用beforeEnter函数来定义,只会对当前路由生效。
在login路由中添加路由独享守卫:
{
    path: '/login',
    name: 'LoginView',
    component: LoginView,
    //路由独享守卫 只对login这一个路由起作用
    beforeEnter: (to, from, next) => {
        // 在访问/login之前执行
        console.log('路由独享守卫生效')
        next()
    }
}
组件内守卫
只有在某个组件被渲染时才会调用的守卫函数
- beforeRouteEnter函数在路由进入当前组件时被调用,但是在组件实例创建之前,因此无法访问this;
- beforeRouteUpdate函数在组件的路由发生变化时被调用,可以用来响应路由变化;
- beforeRouteLeave函数在路由将要离开当前组件时被调用,可以用来进行一些用户确认操作等。
home页添加组件内路由:
<template>
  <div class="home">
    <h1>网站首页</h1>
    <nav>
      <!--声明式路由:使用router-link标签来导航-->
      <router-link to="/home/a">A页面</router-link>
      |
      <router-link to="/home/b">B页面</router-link>
      |
      <router-link to="/home/c">C页面</router-link>
    </nav>
    <!-- 显示路由组件 -->
    <router-view/>
  </div>
</template>

<script>
export default {
  name: 'HomeView',
  beforeRouteEnter(to, from, next) {
    console.log('beforeRouteEnter,在渲染该组件前调用')
    next()
  },
  beforeRouteUpdate(to, from, next) {
    console.log('beforeRouteUpdate,在当前路由发送变化调用,该组件会被反复调用')
    next()
  },
  beforeRouteLeave(to, from, next) {
    console.log('beforeRouteLeave,离开该组件对应的路由时调用')
    next()
  }
}

</script>

<style>
.home h1 {
  color: red;
}
</style>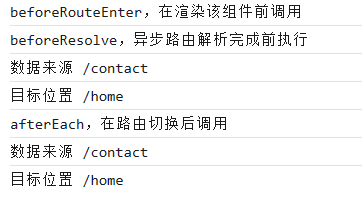
2、Vuex
为Vue.js应用程序开发的状态管理模式,它通过集中管理应用程序中的所有组件的共享状态
核心概念有:state(状态)、actions(操作)、mutations(变更)和 getters(获取器)
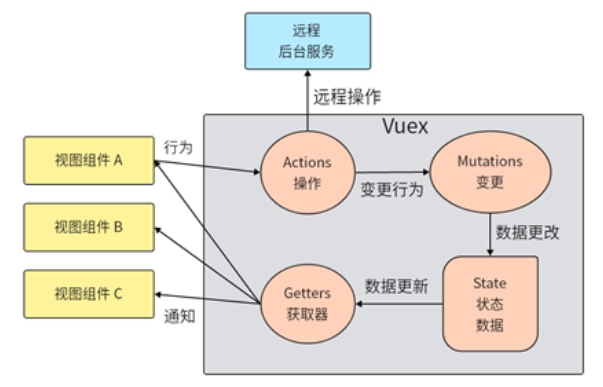
State 对象包含了应用程序的状态,并与所有组件共享。在 Vuex 中,state 对象是一个可响应的对象,它允许 Vue.js 跟踪状态的变化。所有的组件都可以访问状态对象,并通过对其进行修改来影响应用程序的状态。
Mutations 是 Vuex 中改变状态的唯一方法。它们用于同步地更新状态对象。在一个 Mutation 中,通常会进行一些简单的计算和状态更新,以便使组件可以在状态变化时及时得到通知。
Actions 用于提交 Mutations,它们之间的关键区别在于 Mutations 不能是异步的。当需要进行异步操作时,我们应该调用异步 Action,在异步操作完成后再提交 Mutations。异步操作可能包括从服务器获取数据、执行动画效果等。
Getters 用于返回状态对象的特定部分供组件使用。Getter 可以看作是对 State 对象的计算属性。它们可以用于从 state 对象中派生出一些衍生数据。
Vue计算属性
用于处理模板中的表达式,并返回计算结果的属性
在项目中components中创建ComponentDemo.vue
<template>
  <div class="computed-demo">
    <h1>计算属性</h1>
    <p>今天是{{ today }}</p>
    <p>目标日期<input type="date" v-model="targetDate"></p>
    <p>今天距离目标日期{{ targetDate }}还有{{ daysFromNow }}天</p>
  </div>
</template>

<script>
export default {
  name: "ComponentDemo",
  data() {
    return {
      //定义目标日期
      targetDate: '2025-01-01',
      //今天的日期 toISOString()格式化日期 substr日期截取
      today: new Date().toISOString().substr(0, 10)

    }
  },
  computed: {
    //计算属性
    daysFromNow: function () {
      //定义今天的日期
      const today = new Date() //不用上面格式化后的日期更精确
      //定义目标日期
      const targetDate = new Date(this.targetDate)
      //计算时间差 单位是毫秒
      const timeDiff = targetDate.getTime() - today.getTime()
      //将毫秒转换成天
      const daysDiff = timeDiff / (24 * 60 * 60 * 1000)
      //return Math.ceil(daysDiff) //向上取证
      return Math.floor(daysDiff) //向下取整
    }
  }
}
</script>

<style scoped>
.computed-demo{
  border: 1px solid #ccc;
}

</style>
在main.js中导入并注册组件:
import ComponentDemo from "@/components/ComponentDemo"

Vue.component("computed-demo",ComponentDemo)
在App.vue中使用自定义组件:
<template>
  <div id="app">
    <computed-demo></computed-demo>
    <nav>
      <router-link to="/home">首页</router-link>
      |
      <router-link to="/contact">联系我们</router-link>
      |
      <router-link to="/system">系统配置</router-link>
    </nav>
    <!--显示路由组件-->
    <router-view/>
  </div>
</template>
展示效果:

Vuex共享状态
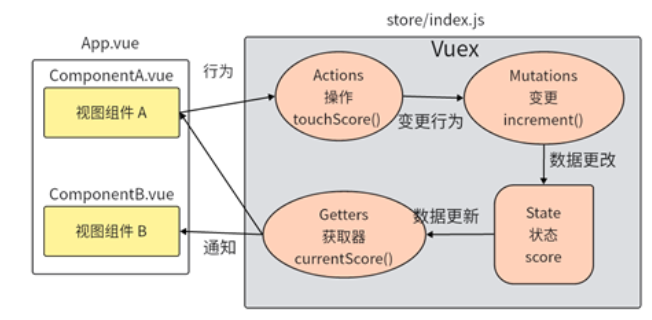
在src/store/index.js 中声明状态score和对应的行为方法
import Vue from 'vue'
import Vuex from 'vuex'

Vue.use(Vuex)

export default new Vuex.Store({
    state: {
        score: 0 //自定义数据
    },
    getters: {
        //获取器 获取自定义的数据
        currentScore(state) {
            return state.score
        }
    },
    //变更数据
    mutations: {
        //修改自定义数据
        increment(state) {
            state.score += 1
        }
    },
    //操作
    actions: {
        touchScore(context){
            console.log("修改数据")
            //触发变更数据
            context.commit('increment')
        }
    },
    modules: {}
})
声明A组件 src/compoment/ComponentA.vue,包含触发更新的事件按钮和显示数据状态的模板位置
<template>
<div class="computed-a">
  <h1>ComputedA</h1>
  <button @click="handleClick">点击+1</button>
  <p>分数:{{score}}</p>
</div>
</template>

<script>
export default {
  name: "ComputedA",
  //计算属性获取state中的score
  computed:{
    score(){
      return this.$store.getters.currentScore
    }
  },
  methods:{
    handleClick: function (){
      //触发actions中的事件touchScore
      this.$store.dispatch('touchScore')
    }
  }
}
</script>

<style scoped>

</style>
main.js中注册组件
import ComputedA from "@/components/ComputedA";

Vue.component("computed-a",ComputedA)
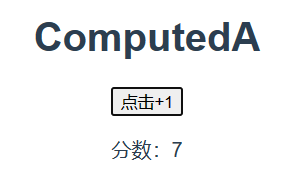
在App.vue中使用组件后效果图:
声明B组件 src/compoment/ComponentB.vue,包含显示数据状态的模板位置
<template>
  <div class="computedB">
    <h1>ComputedB</h1>
    <p>分数:{{ score }}</p>
  </div>
</template>

<script>
export default {
  name: "ComputedB",
  computed: {
    score() {
      return this.$store.getters.currentScore
    }
  }
}
</script>

<style scoped>
.computedB {
  border: 1px solid #aaa;
}

</style>
在src/main.js中注册这个组件:
import ComputedB from "@/components/ComputedB";

Vue.component("computed-b",ComputedB)
在App.vue 中引入组件A和B进行测试:
<computed-a></computed-a>
<computed-b></computed-b>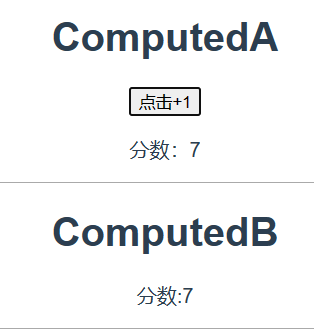
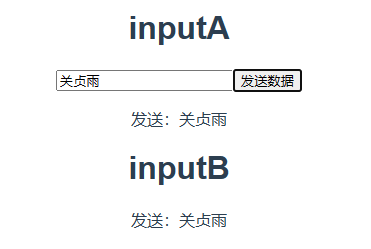
练习:将输入框中的内容共享状态
在index中编写对应的行为方法:
import Vue from 'vue'
import Vuex from 'vuex'

Vue.use(Vuex)

export default new Vuex.Store({
    state: {
        score: 0, //自定义数据
        inputString: ''
    },
    getters: {
        //获取器 获取自定义的数据
        currentString(state) {
            return state.inputString
        }
    },
    //变更数据
    mutations: {
        //修改自定义数据
        increment(state,textToAdd) {
            state.inputString = textToAdd
        }
    },
    //操作
    actions: {
        touchScore(context) {
            context.commit('increment')
        }
    },
    modules: {}
})
编写输入A:
<template>
  <div class="input-a">
    <h1>inputA</h1>
    <input type="text" placeholder="请输入字符串" v-model="string">
    <button @click="inputClick">发送数据</button>
    <p>发送:{{ string }}</p>
  </div>

</template>

<script>

export default {
  name: "inputA",
  data() {
    return {
      string: ''
    }
  },
  computed: {
    string() {
      return this.$store.getters.currentString
    }
  },
  methods: {
    inputClick: function () {
      const textToAdd = this.string
      this.$store.commit('increment', textToAdd)
    }
  }
}
</script>

<style scoped>

</style>
编写输出B,自定义组件并在App.vue中展示,此处省略,直接看结果:
二、项目打包部署
Vue CLI 提供了一套完整的开发和打包流程,开发者可以通过命令行工具创建项目、添加依赖、进行开发、调试、测试、打包和部署等一系列操作。
在开发阶段:
- 创建 Vue 项目:可以使用 Vue CLI 提供的 create 命令来创建一个新的 Vue 项目,例如:vue create my-project。
- 开发页面:在创建好的项目中,开发者可以使用 Vue.js 的单文件组件编写页面。
- 添加依赖:在开发过程中,可能需要添加一些第三方库或插件,可以使用 npm 或 yarn 安装这些依赖。
- 调试项目:在开发过程中,可以使用 Vue CLI 提供的 serve 命令来启动本地开发服务器,实时预览项目。
- 测试项目:Vue CLI 提供了测试工具,可以使用 test 命令来运行测试用例,例如使用 Jest 进行单元测试。
在打包阶段:
- 构建项目:在开发完成后,可以使用 build 命令将项目构建为生产环境可用的静态文件,例如:npm run build。
- 部署项目:将打包好的静态文件部署到服务器上,使用户可以访问。
