一、异步请求与表单校验
1、异步请求与AJAX
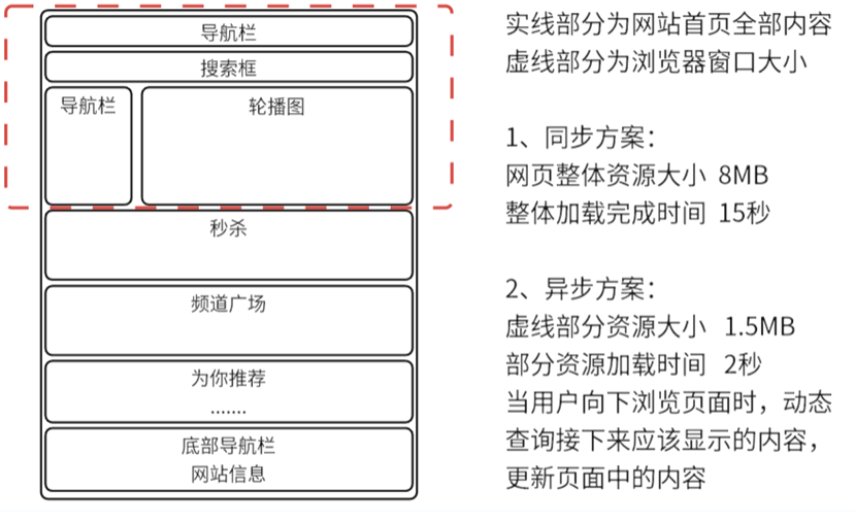
(1)同步请求和异步请求
当浏览器向服务器发送请求时,可以选择发送同步请求或异步请求。它们的主要区别在于发送请求后是否等待响应返回。
同步请求需要等服务器发送响应后才能继续后续操作,这样就会产生一种假死的情况,我们可以使用异步请求来解决这个问题。

(2)页面的整体刷新和局部刷新
整体刷新:整个的页面都会刷新一遍
局部刷新:异步请求的刷新方式,每次操作后逐步的获取页面中不同部分的内容,一点一点的加载,大大提高效率。
(3)AJAX(Asynchronous JavaScript and XML)
向服务器发送异步请求并获取数据,加载局部内容。

(4)JSON
JSON是一种轻量级数据交换格式,可以在不同平台之艰难轻松的共享数据,是以键值对的形式传递数据。
优点:可读性强,易于生成,数据量小,易于扩展,平台无关性(支持跨平台)
(5)发送AJAX的请求方式
1、使用原生的XMLHttpRequest对象发送请求。代码量大,相对复杂,几乎不用。
2、使用jQuery发送请求。jQuery已经将原生的XMLHttpRequest对象包装起来,其代码较为简洁易懂,容易上手,曾经被广泛使用,现在已经逐步淘汰。
3、使用Fetch API发送请求。Fetch API是一种新的网络请求API,可替代XMLHttpRequest,并具有更简洁和强大的特性,使用不多。
4、使用Axios发送请求。Axios是一个基于Promise的HTTP客户端,可以在浏览器和Node.js中对URL进行请求,可以使用vue进行结合,使用相对较多。
2、Axios
它是前端 HTTP 库,可以用于浏览器和Node.js,可以用于发送 Ajax 请求和处理服务器响应数据。
可以与Vue搭配使用(但不需要,不能说成需要和Vue搭配使用)
(1)Axios的用法
首先创建实体类:
public class User {
    private Integer id;
    private String username;
    private String nickname;

    此处省略.....
}
然后创建controller:
@Controller
public class HelloController {
    @RequestMapping("/hello") //声明请求的URL地址
    @ResponseBody //声明响应的内容类型 如果方法的返回值类型是一个对象,会自动转换为json格式
    public List<User> hello() {
        List<User> users = new ArrayList<>();
        users.add(new User(1, "刘备", "玄德"));
        users.add(new User(2, "关羽", "云长"));
        users.add(new User(3, "张飞", "翼德"));
        users.add(new User(4, "赵云", "子龙"));
        users.add(new User(5, "黄忠", "汉升"));
        users.add(new User(6, "马超", "孟起"));
        return users;
    }
}
最后写页面:
<!DOCTYPE html>
<html lang="en">
<head>
    <meta charset="UTF-8">
    <title>第一个AJAX程序</title>
    <!-- 引入AXIOS资源 -->
    <script src="https://cdn.staticfile.org/axios/1.4.0/axios.min.js"></script>
</head>
<body>
<input type="button" value="点击获取数据" onclick="getData()">
<div id="dataDiv"></div>
<script type="text/javascript">
    function getData() {
        //发送get请求
        //then中的function是一个回调函数,发送ajax请求后,回来执行的函数
        axios.get('http://localhost:8080/hello').then(function (response) {
            //获取响应数据,forEach循环遍历所有数据
            response.data.forEach(function (item) {
                //item表示当前遍历的数据,放在页面的div中
                //首先放之前要得到div,item获取login信息
                document.querySelector("#dataDiv").innerHTML +="username:"+ item.username+"<br>";
            })
        })
    }
</script>
</body>
</html>
(2)Vue整合Axios示例
<!DOCTYPE html>
<html lang="en">
<head>
    <meta charset="UTF-8">
    <title>Vue整合Axios</title>
    <!-- 引入Vue组件 -->
    <script src="https://cdn.staticfile.org/vue/2.6.14/vue.min.js"></script>
    <!-- 引入AXIOS资源 -->
    <script src="https://cdn.staticfile.org/axios/1.4.0/axios.min.js"></script>
</head>
<body>
<div id="app">
    <input type="button" value="点击获取数据" @click="getData()">
    <div>
        <h1>用户列表</h1>
        <ul>
            <li v-for="user in users">{{user.id}} -- {{user.username}} -- {{user.nickname}}</li>
        </ul>
    </div>
</div>

<script type="text/javascript">
    let v = new Vue({
        el: "#app", //声明作用范围
        data: {
            users: []
        },
        methods: {
            //绑定的单击事件
            getData() {
                //发送ajax请求
                axios.get('http://localhost:8080/hello').then(function (resp) {
                    //获取返回的数据 放在data的users中
                    //...表示展开resp.data得到的json数组
                    v.users.push(...resp.data);
                }).catch(function (error) {
                    //出现错误会执行catch部分的回调函数
                    console.log(error);
                })
            }
        }
    })
</script>
</body>
</html>
3、注册案例(续)
(1)案例准备工作
<dependency>
    <groupId>mysql</groupId>
    <artifactId>mysql-connector-java</artifactId>
    <version>8.0.15</version>
</dependency>
<dependency>
    <groupId>com.alibaba</groupId>
    <artifactId>druid</artifactId>
    <version>1.1.21</version>
</dependency>
<dependency>
    <groupId>org.springframework.boot</groupId>
    <artifactId>spring-boot-starter-validation</artifactId>
</dependency>
(2)页面发送注册请求
添加的html内容:
<!-- 引入AXIOS资源 -->
<script src="https://cdn.staticfile.org/axios/1.4.0/axios.min.js"></script>
<script>
    let v = new Vue({
        el: '#app',
        data: function () {
            return {
                formData: {
                    username: '',
                    password: '',
                    checkPass: ''
                }
            }
        },
        methods: {
            register() {
                //定义发送的请求参数
                let param = {
                    username: v.formData.username, //得到用户名
                    password: v.formData.password  //得到密码
                };
                //发送post请求,第二个参数表示发送请求传递的参数
                axios.post("http://localhost:8080/user/register", param).then(function (resp) {
                    //打印响应
                    console.log(resp)
                    if (resp.data == "注册成功") {
                        //弹出个成功框
                        v.$message.success(resp.data);
                    }else{
                        v.$message.error(resp.data);
                    }
                });

            }
        }
    })
</script>
4、前端表单校验
在用户填写表单的时候,通过js对输入的代码进行验证,确保数据的有效性、完整性和唯一性,前端对一般用户进行约束。
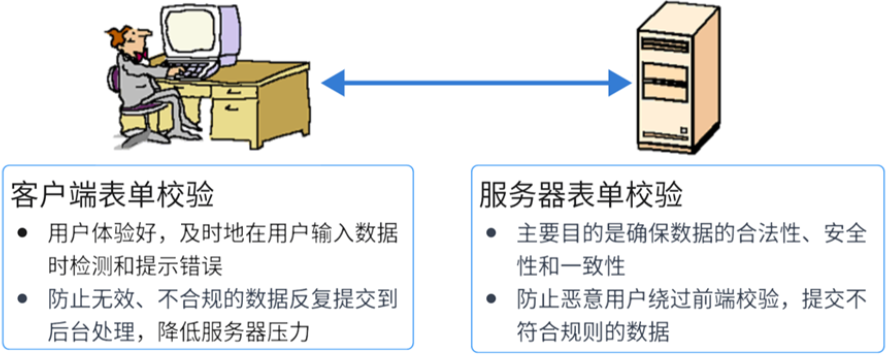
Element UI表单校验
使用 rules 属性定义验证规则。
基于Element UI实现前端表单校验的步骤如下:
1、引入Element UI组件:在项目中引入Element UI组件库。
2、创建表单和字段: 在页面中使用 el-form 和 el-form-item 组件创建表单,并定义表单字段。
3、定义验证规则: 在 Vue 组件的 data 中定义表单数据和验证规则。验证规则是一个对象,键为字段名,值为验证规则数组。
4、应用验证规则: 将定义的验证规则应用到 el-form-item 组件的 prop 属性上,与表单字段对应。
5、提交表单: 在表单提交时,调用 el-form 组件的 validate 方法进行表单校验。
rules: {
    //定义前端校验规则
    username: [
        //表示是个必填项 不能为空 如果为空则提示message中的消息
        //trigger: "blur" 光标离开文本框则触发
        {required: true, message: "用户名不能为空", trigger: "blur"},
        {min: 4, max: 20, message: "长度在4到20个字符之间", trigger: "blur"}
    ],
    password: [
        {required: true, message: "密码不能为空", trigger: "blur"},
        {min: 6, max: 20, message: "长度在6到20之间", trigger: "blur"}
    ],
    checkPass: [
        {
            //自定义校验规则 rule表示声明的规则,value表示自己输入的内容
            //callback表示回调函数
            //validator表示自定义的校验规则
            validator: function (rule, value, callback) {
                //内容不能为空
                if (value == "") {
                    callback(new Error("请再次输入密码"));
                } else if (value != v.formData.password) {
                    callback(new Error("两次输入的密码不一致"));
                } else {
                    callback();
                }
            },trigger:"change" //只要内容改变就可以触发
        }
    ]
}

//表单中修改的内容
            <el-form :model="formData" :rules="rules" ref="regForm">
                <h2>注册<small><a href="login.html">登录</a></small></h2>
                <el-form-item prop="username">
                    <el-input type="text"
                              v-model="formData.username"
                              placeholder="请输入用户名"
                              suffix-icon="el-icon-user"></el-input>
                </el-form-item>
                <el-form-item prop="password">
                    <el-input type="password"
                              v-model="formData.password"
                              placeholder="请输入密码"
                              suffix-icon="el-icon-lock"></el-input>
                </el-form-item>
                <el-form-item prop="checkPass">
                    <el-input type="password"
                              v-model="formData.checkPass"
                              placeholder="请再次输入密码"
                              suffix-icon="el-icon-lock"></el-input>
                </el-form-item>
                <el-form-item>
                    <!--让某一个元素位置进行微调时 使用相对定位-->
                    <el-button type="primary" @click="register()">注册</el-button>
                </el-form-item>
            </el-form>


//修改函数
 methods: {
            register() {
                //通过校验才发送请求
                //访问自定义表单验证规则
                v.$refs.regForm.validate(function (valid) {
                    if (valid) {
                        //验证通过发送请求
                        //定义发送的请求参数
                        let param = {
                            username: v.formData.username, //得到用户名
                            password: v.formData.password  //得到密码
                        };
                        //发送post请求,第二个参数表示发送请求传递的参数
                        axios.post("http://localhost:8080/user/register", param).then(function (resp) {
                            //打印响应
                            console.log(resp)
                            if (resp.data == "注册成功") {
                                //弹出个成功框
                                v.$message.success(resp.data);
                            } else {
                                v.$message.error(resp.data);
                            }
                        });
                    } else {
                        //如果验证不通过,验证失败
                        console.log("表单验证失败");
                    }
                })
            }
        }
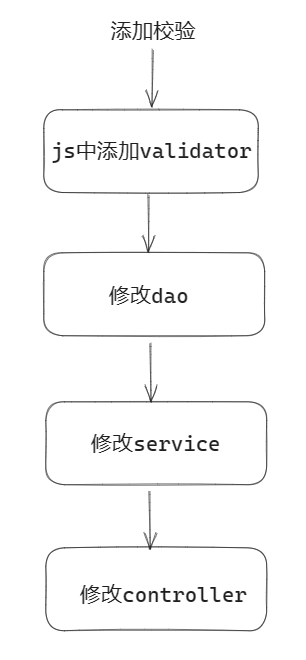
如果需要在一开始输入用户名时校验用户名是否存在,需要在规则中添加校验:
//js的lambda表达式
validator: (rule, value, callback) => {
    let param = {params: {username: v.formData.username}};
    axios.get("/user/exists", param).then(resp => {
        console.log(resp);
        //处理响应
        if (resp.data == "用户名可用") {
            callback(); //什么也不干
        } else {
            callback(new Error(resp.data)); //返回错误内容
        }
    })
}, trigger: "blur"
校验填写完后根据get请求的地址我们可以得知需要添加新的controller(但我们需要从dao层开始写):
dao层接口:
/**
 * 注册验证用户名是否存在
 *
 * @param username 用户名
 * @return 返回根据用户名查询的行数有几行
 */
int exits(String username);
dao层实现类:
@Override
public int exits(String username) {
    int result = 0;
    try (
            Connection connection = DBUtil.getConnection();
    ) {
        String sql = "SELECT count(*) FROM user WHERE username=?";
        PreparedStatement ps = connection.prepareStatement(sql);
        ps.setString(1, username);
        ResultSet rs = ps.executeQuery();
        if (rs.next()) {
            result = rs.getInt(1);
        }
    } catch (SQLException e) {
        e.printStackTrace();
    }
    return result;
}
service层接口:
/**
 * 注册验证用户名是否存在
 * @param username 用户名
 */
void exits(String username);
service层实现类:
@Override
public void exits(String username) {
    int result = userDao.exits(username);
    if (result > 0) {
        //大于0说明存在
        throw new UserException("用户名已存在");
    }
}
controller层代码:
@RequestMapping("/user/exists")
@ResponseBody
public String exists(String username) {
    try {
        userService.exits(username);
    } catch (UserException e) {
        String message = e.getMessage();
        return message;
    }
    return "用户名可用";
}
二、MyBatis框架基础
1、MyBatis概述
mybatis可以将业务逻辑与数据访问代码分离,是当下应用比较多的技术。
mybatis官方文档:MyBatis中文网
2、MyBatis与JDBC的关系
MyBatis的主要作用是让开发者在编写数据库访问代码时,仅需要关注要执行的SQL语句,参数与SQL的绑定关系以及结果集的处理逻辑,其他部分由MyBatis代为完成。
MyBatis底层使用的仍是JDBC技术。
3、在Spring Boot项目中使用MyBatis框架
通常使用Spring Boot整合MyBatis框架,由Spring Boot来简化相关配置。
在Spring Boot项目中使用MyBatis框架一般需要如下步骤。
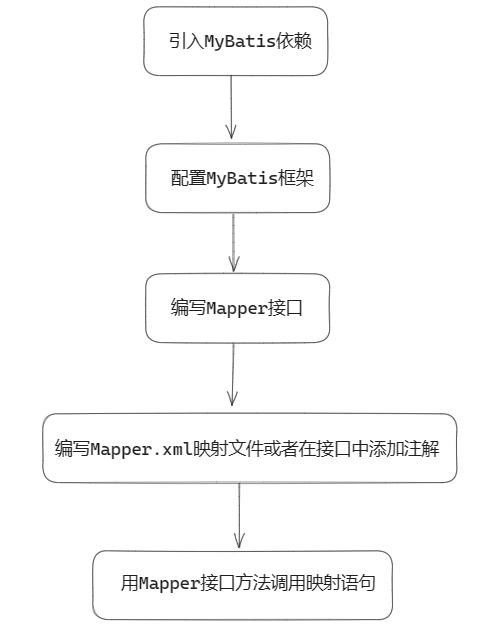
1、引入MyBatis依赖
<dependency>
    <groupId>org.mybatis.spring.boot</groupId>
    <artifactId>mybatis-spring-boot-starter</artifactId>
    <version>3.0.2</version>
</dependency>
2、在Spring Boot中配置MyBatis框架
#注释
#properties是一种map集合 文件中所有内容以键值对的形式存储
#配置数据库的驱动
#☆等号前后不能有空格
spring.datasource.driver-class-name=com.mysql.cj.jdbc.Driver
#数据源
spring.datasource.name=defaultDataSource
#数据库连接
spring.datasource.url=jdbc:mysql://localhost:3306/coolsharkhub?useSSL=false&serverTimeZone=Asia/Shanghai
#数据库用户名
spring.datasource.username=root
#数据库密码
spring.datasource.password=root
#开启日志 debug为日志的级别 仅限开发过程中测试使用 项目上线后要删除或者改级别
logging.level.cn.highedu.boot2.mapper=debug
3、编写Mapper接口
- 使用接口中的抽象方法来声明要执行的数据库操作
@Mapper //声明这是一个持久层接口
public interface UserMapper {
    /**
     * 查询所有用户
     * @return
     */
    @Select("select * from user")
    List<User> listAllUser();

}
单元测试:
@SpringBootTest //声明这是一个springboot测试类
class UserMapperTest {
    //获取spring的组件
    //获取spring实例化的UserMapper接口的实现类对象
    @Autowired //注入被spring实例化的对象
    UserMapper userMapper;

    @Test
    void listAllUser() {
        List<User> users = userMapper.listAllUser();
        //::为函数式引用
        users.forEach(System.out::println);
    }
}
4、编写Mapper.xml映射文件或者在接口中添加注解
- Mapper.xml文件用于描述Java对象和SQL语句之间的映射关系
- 简单的SQL语句可以通过在Mapper接口的方法前添加注解来实现
5、用Mapper接口方法调用映射语句
4、值的传递
- 单值传递
- 对象传值
- Map传值(一些开发规范中禁止使用)
单值传递示例:
//#{id}是占位符 id要和方法中的参数名称一致 类似jdbc中的占位符“?”
@Select("select * from user where id=#{id}")
User getById(Integer id);

//多个值需要传递
//注解param声明这一个sql语句的参数 username要和sql语句中的#{username}保持一致
@Select("select * from user where username=#{username} and password=#{password}")
User getUser(@Param("username") String username,@Param("password") String password);

//测试
    @Test
    void getById() {
        User user = userMapper.getById(1);
        System.out.println(user);
    }

    @Test
    void getUser() {
        User user = userMapper.getUser("zhangsan", "123456");
        System.out.println(user);
    }
对象传值:
/**
 * 保存一个用户
 */
//#{username}在执行的时候自动调用相应的get方法到user对象中取值
@Insert("insert into user (username,password,role) " +
        "values(#{username},#{password},#{role})")
int insertUser(User user);

//测试
  @Test
    void insertUser() {
        User user = new User(null, "SmallG", "123456", "普通用户", null, null);
        userMapper.insertUser(user);
    }
5、#{}和${}
“#{}”可以防止sql注入攻击的,${}不行
三、练习
1 添加商品用例
请在Homework项目下新建一个Module,该Module为一个Spring Boot项目,命名为ssm_hw02,作为今天的课后作业项目。
在该项目中实现添加商品用例。具体要求:
1、商品需要包含id(整型),title(字符串), price(浮点)和num(整型)共4个属性。
2、数据库表使用ssm_hw01db中的product表即可。
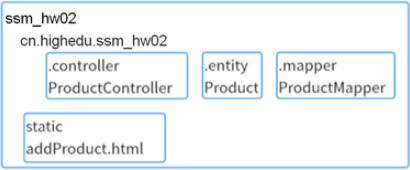
3、ssm_hw02中的包名、类名、静态资源文件名称如图所示
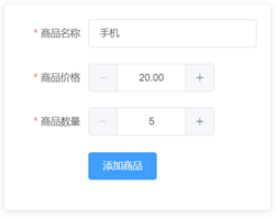
4、addProduct.html参考效果如图所示:
技术要求:
1、基于MyBatis框架实现持久层访问。
2、基于Element UI和Vue实现前端页面,数值类型的表单组件及校验方法请查阅官方文档或AI工具。
3、添加完善的前后端表单校验逻辑。
- 商品名称在2-20个字符之间,且不能添加同名的商品
- 商品价格不能小于20元
- 库存数量不能小于5,且不能大于100
实体类:
/**
 * @document:
 * @Author:SmallG
 * @CreateTime:2023/9/4+21:34
 */

public class Product {
    private Integer id;
    @NotBlank(message = "商品名称不能为空")
    @Size(min = 2, max = 20, message = "商品名称长度的范围为2~20")
    private String title;
    @NotNull(message = "商品价格不能为空")
    @Min(value = 20, message = "商品价格不能小于20")
    private Double price;
    @NotNull(message = "库存不能为空")
    @Min(value = 5, message = "库存数量不能小于5")
    @Max(value = 100, message = "库存数量不能大于100")
    private Integer num;

    省略...
}
properties配置文件:
spring.datasource.driver-class-name=com.mysql.cj.jdbc.Driver
spring.datasource.url=jdbc:mysql://localhost:3306/ssm_hw01db
spring.datasource.name=defaultDataSource
spring.datasource.username=root
spring.datasource.password=root
logging.level.cn.highedu.boot2.mapper=debug
mapper类:
@Mapper
public interface ProductMapper {

    @Insert("insert into product (title,price,num) values(#{title},#{price},#{num})")
    int insertProduct(Product product);

    @Select("select * from product where title = #{title}")
    Product getProductByTitle(String title);

}
controller类:
@Controller
@RequestMapping("/product")
public class ProductController {
    @Autowired
    ProductMapper productMapper;

    @GetMapping ("/exists")
    @ResponseBody
    public String usernameExists(String title){
        if (productMapper.getProductByTitle(title)!=null){
            return "商品已存在";
        }
        return "商品标题可用";
    }

    @PostMapping ("/add")
    @ResponseBody
    public String addProduct(@RequestBody @Valid Product product, BindingResult bindingResult){
        //参数验证
        if (bindingResult.hasErrors()){
            return bindingResult.getFieldError().getDefaultMessage();
        }
        //将商品信息插入到数据库中
        int row = productMapper.insertProduct(product);
        if (row == 0){
            return "商品添加失败!";
        }
        return "商品添加成功!";
    }

}
前端页面:
<!DOCTYPE html>
<html lang="en">
<head>
    <meta charset="UTF-8">
    <title>添加商品</title>
    <link rel="stylesheet" href="https://cdn.staticfile.org/element-ui/2.15.9/theme-chalk/index.css">
    <style>
        .el-card{
            width: 380px;
        }
    </style>
    <script src="https://cdn.staticfile.org/vue/2.6.14/vue.min.js"></script>
    <script src="https://cdn.staticfile.org/element-ui/2.15.9/index.min.js"></script>
    <script src="https://cdn.staticfile.org/axios/1.4.0/axios.min.js"></script>
</head>
<body>
<el-container id="app">
    <el-main>
        <el-card>
            <el-form :model="formData" :rules="rules" ref="ruleForm" label-width="100px">
                <el-form-item label="商品名称" prop = "title">
                    <el-input type="text" v-model="formData.title"
                              placeholder="请输入商品标题"></el-input>
                </el-form-item>
                <el-form-item label="商品价格" prop = "price">
                    <el-input-number v-model="formData.price"
                                     :precision="2" :step="0.1" :min="20"></el-input-number>
                </el-form-item>
                <el-form-item label="商品数量"  prop = "num">
                    <el-input-number v-model="formData.num" :min="5" :max="100"></el-input-number>
                </el-form-item>
                <el-form-item>
                    <el-button type="primary" @click="add()" >添加商品</el-button>
                </el-form-item>
            </el-form>
        </el-card>
    </el-main>
</el-container>

<script>
    let v = new Vue({
        el: '#app',
        data: function () {
            return {
                formData: {
                    title: '',
                    price: '',
                    num: ''
                },
                rules: {
                    title: [
                        { required: true, message: '请输入商品名称', trigger: 'blur' },
                        { min: 2, max: 20, message: '长度在 2 到 20 个字符', trigger: 'blur' },
                        { validator: (rule, value, callback) => {
                                // 特别注意get请求的参数格式
                                let param ={params: {"title": this.formData.title}}
                                // 发送请求
                                axios.get("/product/exists", param).then(response=>{
                                    // 处理响应数据
                                    if(response.data === '商品标题可用!'){
                                        callback();
                                    }else{
                                        callback(new Error(response.data))
                                    }
                                })
                            }, trigger: 'blur' }
                    ],
                    price: [
                        { required: true, message: '请输入价格', trigger: 'blur' },
                        { type: 'number', min: 20, message: '价格不能低于20元', trigger: 'blur' }
                    ],
                    num: [
                        { required: true, message: '请输入数量', trigger: 'blur' },
                        { type: 'number', min:5, max:100,  message: '数量必须在5-100之间', trigger: 'blur' }
                    ]
                }
            }
        },
        methods: {
            add() {
                // 通过 this.$refs.ruleForm 访问表单实例
                this.$refs.ruleForm.validate((valid) => {
                    if (valid) { // 表单验证通过,发送请求
                        // 生成请求参数
                        let param = {
                            title: this.formData.title,
                            price: this.formData.price,
                            num: this.formData.num
                        }
                        // 发送请求
                        axios.post("/product/add", param).then(response=>{
                            // 处理响应数据
                            if(response.data === '商品添加成功!'){
                                this.$message.success(response.data)
                            }else{
                                // 添加失败
                                this.$message.error(response.data)
                            }
                        })
                    } else { // 表单验证失败
                        console.log('表演验证失败!');
                    }
                });
            }
        }
    })
</script>
</body>
</html>