一、Vue应用案例
1、案例准备工作
(1)实现功能
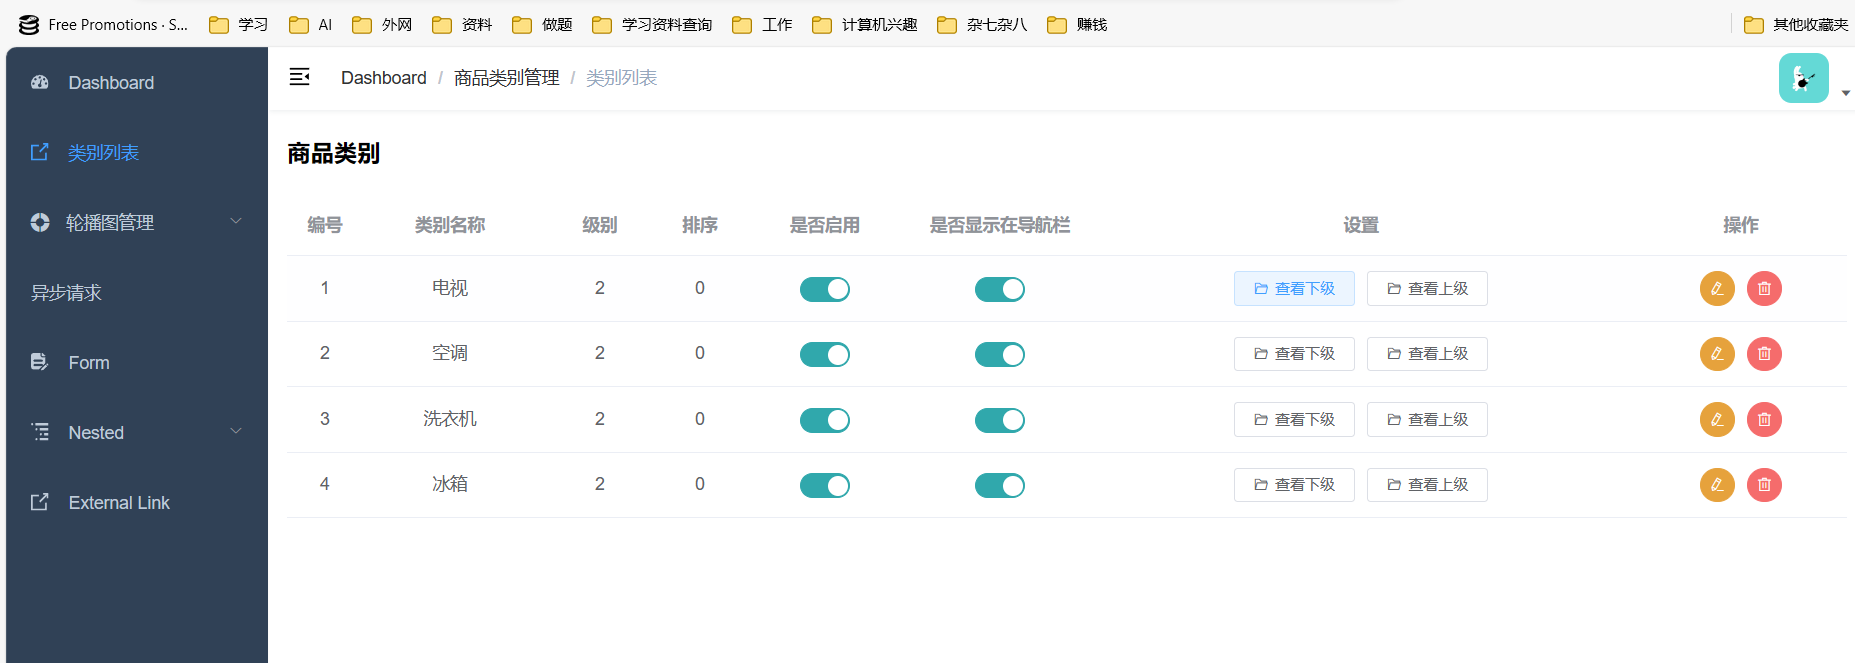
实现商品类别管理,包含类别列表和新增商品类别。
(2)Mock.js概述
Mock.js用于生成模拟数据,通常用于前端开发和测试。它可以帮助开发人员模拟后端 API 的响应数据,以便在没有实际后端服务的情况下进行前端开发,测试和调试。

(3)添加模拟接口示例
创建hello.js
module.exports = [
  //模拟发送Ajax请求
  {
    url: '/hello', //请求地址
    type: 'get',  //请求类型
    response: config => {
      return {
        code: 20000, //ok
        data: {
          message: 'Hello World!'
        }
      }
    }
  }
]
将组件添加到index.js中的mock数组中:
const user = require('./user')
const table = require('./table')
const hello = require('./hello')

const mocks = [
  ...user,
  ...table,
  ...hello
]请求的地址为:http://localhost:9528/dev-api/hello
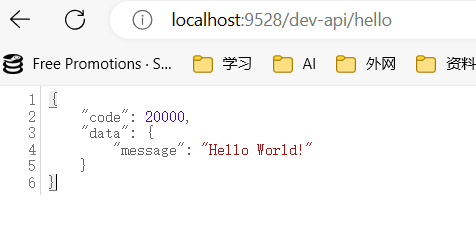
(4)request.js文件
ue-element-admin在src/utils下提供了一个request.js文件,用于提供简化发送异步请求和处理响应内容的支持。
request.js中创建了一个Axios实例,并为该实例添加了请求拦截器和响应拦截器。
请求拦截器的主要作用是为已登录用户在请求中添加token(SEC部分展开介绍)。
响应拦截器的主要作用是获取响应状态码,并根据约定进行一些错误处理。
- 20000为响应成功的状态码
- 50008、50012、50014为身份信息异常的状态码,提示用户重新登录
- 如果与服务器的连接出现异常,也会提示错误信息,并将错误信息输出到浏览器控制台
(5)发送异步请求示例
getHello用于发送AJAX请求
在src/api文件夹下新建helloDemo.js文件,在其中封装异步请求接口的方法
import request from '@/utils/request' //引入request.js组件

export function getHello(){
  return request({
    //返回request 发送AJAX请求
    url: "/hello",
    method: "get" //请求类型
  })
}
在views下demo里创建index.view
<template>
  <div class="grid-content bg-purple">
    <h3 style="line-height: 32px">
      {{msg}}
    </h3>
  </div>

</template>

<script>
//导入getHello方法
import {getHello} from '@/api/helloDemo'

export default {
  name: 'index',
  data(){
    return{
      msg: ""
    }
  },
  mounted() {
    //自动发送请求
    getHello().then(res =>{
      this.msg = res.data; //获取请求的数据
    }).catch()
  }
}
</script>

<style scoped>

</style>
hello.js数据:
module.exports = [
  //模拟发送Ajax请求
  {
    url: '/hello', //请求地址
    type: 'get',  //请求类型
    response: config => {
      return {
        code: 20000, //ok
        data: {
          message: 'Hello World!'
        }
      }
    }
  }
]
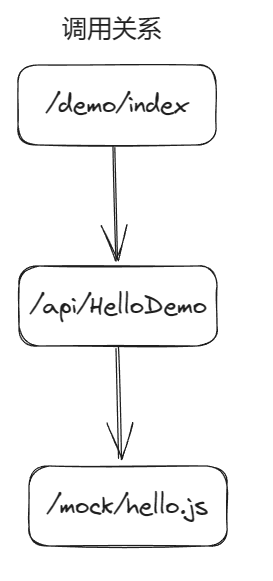
联系:
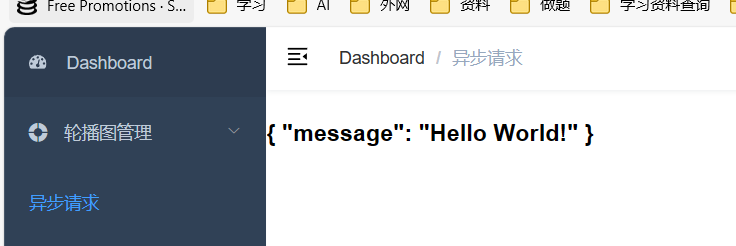
请求效果展示:
2、开发商品类别模块
(1)添加案例接口文件
将pms_category.js文件添加到mock中,这个文件的主要作用是模拟接口的js文件。
在/mock/index.js文件中导入该文件,并添加到mocks数组中
const user = require('./user')
const table = require('./table')
const hello = require('./hello')
const category = require('./pms_category')

const mocks = [
  ...user,
  ...table,
  ...hello,
  ...category
]
(2)实现商品类别列表-展示一级类别
1、新增的目录结构为:src -> views -> product -> category -> list -> index.vue。
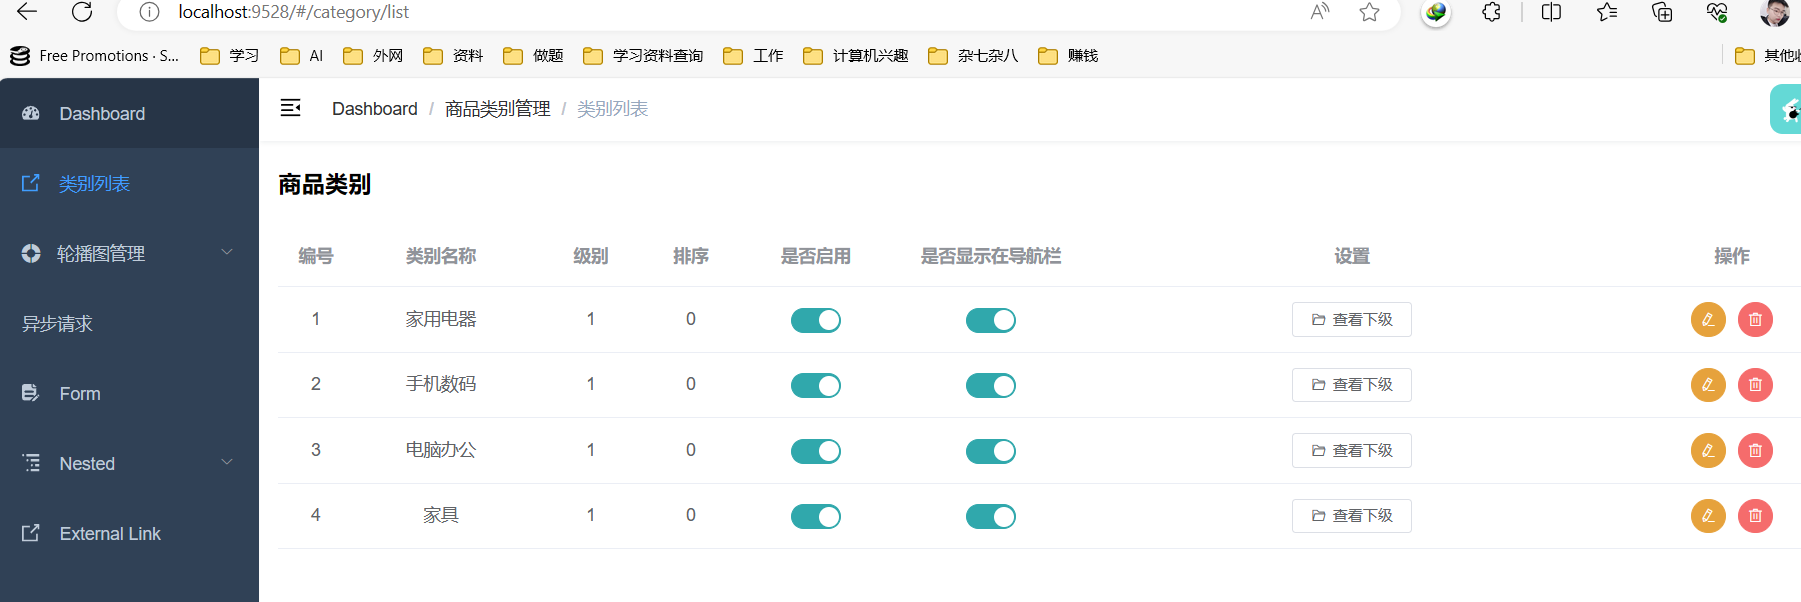
2、【是否启用】、【是否显示在导航栏】列根据数据的enable属性的值和is_display属性的值进行显示。
3、【设置】列根据数据的is_parent属性的值决定是否显示按钮。
4、页面挂载完成后,向品类数据接口发送异步请求,获取一级类别数据,并动态显示在页面中。
5、可以参考table/index.vue中的内容进行开发。
步骤一:实现页面组件
<template>
  <div style="padding: 0 15px">
    <el-row>
      <el-col :span="8">
        <h3 style="line-height: 32px">商品类别</h3>
      </el-col>
    </el-row>
    <el-table :data="tableData">
      <el-table-column align="center" label="编号" width="60" type="index"/>
      <el-table-column align="center" label="类别名称" width="140">
        <template slot-scope="scope">{{ scope.row.name }}</template>
      </el-table-column>
      <el-table-column align="center" label="级别" width="100">
        <template slot-scope="scope">{{ scope.row.depth }}</template>
      </el-table-column>
      <el-table-column align="center" label="排序" width="60">
        <template slot-scope="scope">{{ scope.row.sort }}</template>
      </el-table-column>
      <el-table-column align="center" label="是否启用" width="140">
        <template slot-scope="scope">
          <el-switch v-model="scope.row.enable"
                     :active-value="1"
                     :inactive-value="0"
                     active-color="#30a8ac"
          />
        </template>
      </el-table-column>
      <el-table-column align="center" label="是否显示在导航栏" width="140">
        <template slot-scope="scope">
          <el-switch v-model="scope.row.is_display"
                     :active-value="1"
                     :inactive-value="0"
                     active-color="#30a8ac"
          />
        </template>
      </el-table-column>

      <el-table-column align="center" label="设置">
        <template slot-scope="scope">
          <el-button
            v-if="scope.row.is_parent"
            title="查看下级"
            size="mini"
            icon="el-icon-folder-opened"
          >查看下级
          </el-button>
        </template>
      </el-table-column>

      <el-table-column align="center" label="操作" width="170">
        <template>
          <el-button title="编辑"
                     type="warning"
                     size="mini"
                     icon="el-icon-edit"
                     circle
          ></el-button>
          <el-button title="删除"
                     type="danger"
                     size="mini"
                     icon="el-icon-delete"
                     circle
          ></el-button>
        </template>
      </el-table-column>

    </el-table>
  </div>
</template>

<script>
export default {
  name: 'index',
  data() {
    return {
      tableData: [
        {
          'id': 1,
          'name': '家用电器',
          'parent_id': 0,
          'depth': 1,
          'keywords': '无',
          'sort': 0,
          'icon': 'https://cube.elemecdn.com/e/fd/0fc7d20532fdaf769a25683617711png.png',
          'enable': 1,
          'is_parent': 1,
          'is_display': 1,
          'gmt_create': '2022-07-08 11:30:44',
          'gmt_modified': '2022-07-08 11:30:44'
        },
        {
          'id': 2,
          'name': '电视',
          'parent_id': 1,
          'depth': 2,
          'keywords': '无',
          'sort': 0,
          'icon': 'https://cube.elemecdn.com/e/fd/0fc7d20532fdaf769a25683617711png.png',
          'enable': 1,
          'is_parent': 1,
          'is_display': 1,
          'gmt_create': '2022-07-08 11:30:44',
          'gmt_modified': '2022-07-08 11:30:44'
        }
      ]
    }
  }
}
</script>

<style scoped>

</style>
步骤二:路由导航
{
  path: '/category',
  component: Layout,
  name: 'Category',
  meta: { title: '商品类别管理', icon: 'link' },
  children: [
    {
      path: 'list',
      name: 'CategoryList',
      component: () => import('@/views/product/category/list/index'),
      meta: { title: '类别列表', icon: 'link' }
    }
  ]
},
测试效果:

步骤三:实现异步请求
在src/api文件夹下声明category.js文件,并在该文件夹中添加发送异步请求的方法。
import request from '@/utils/request'

export function queryByParentId(param) {
  return request({
    url: '/categories/queryByParentId?parentId='+param,
    method: 'get'
  })
}
修改views/product/category/list/index.vue文件中的代码,删除测试数据,改为发送异步请求,并使用得到的响应数据。
<script>
import category from '@/api/category'
export default {
  name: 'index',
  data() {
    return {
      tableData: []
    }
  },
  methods: {
    loadCategoryList(parentId){
      category.queryByParentId(parentId).then((res) =>{
        this.tableData = res.data.items;
      })
    }
  },
  mounted() {
    //自动调用
    this.loadCategoryList(0);
  }
}
</script>
运行效果:
(3)实现商品类别列表-展示其他级类别
为按钮添加事件,实现查看下级功能
<el-button
  v-if="scope.row.is_parent"
  title="查看下级"
  size="mini"
  icon="el-icon-folder-opened"
  @click="loadCategoryList(scope.row.id)"
>查看下级
</el-button>显示查看上级功能:
在/category/list/index在查看下级按钮下添加查看上级按钮
<el-button
  v-if="scope.row.parent_id != 0"
  title="查看上级"
  size="mini"
  icon="el-icon-folder-opened"
  @click="loadParentCategoryList(scope.row.parent_id)"
>查看上级
</el-button>
修改category.js的内容:
import request from '@/utils/request'

export function queryByParentId(param) {
  return request({
    url: `/categories/queryByParentId?parentId=${param}`,
    method: 'get'
  })
}

export function queryById(param){
  return request({
    url: `/categories/queryById?id=${param}`,
    method: 'get'
  })
}
在/category/list/index中新添加loadParentCategoryList方法:
methods: {
  loadCategoryList(parentId) {
    api.queryByParentId(parentId).then((res) => {
      this.tableData = res.data.items
    })
  },
  loadParentCategoryList(parentId) {
    api.queryById(parentId).then((res) => {
      console.log('加载父级列表:', res)
      parentId = res.data.items[0].parent_id
      this.loadCategoryList(parentId)
    })
  }
}
(4)实现新增商品类别
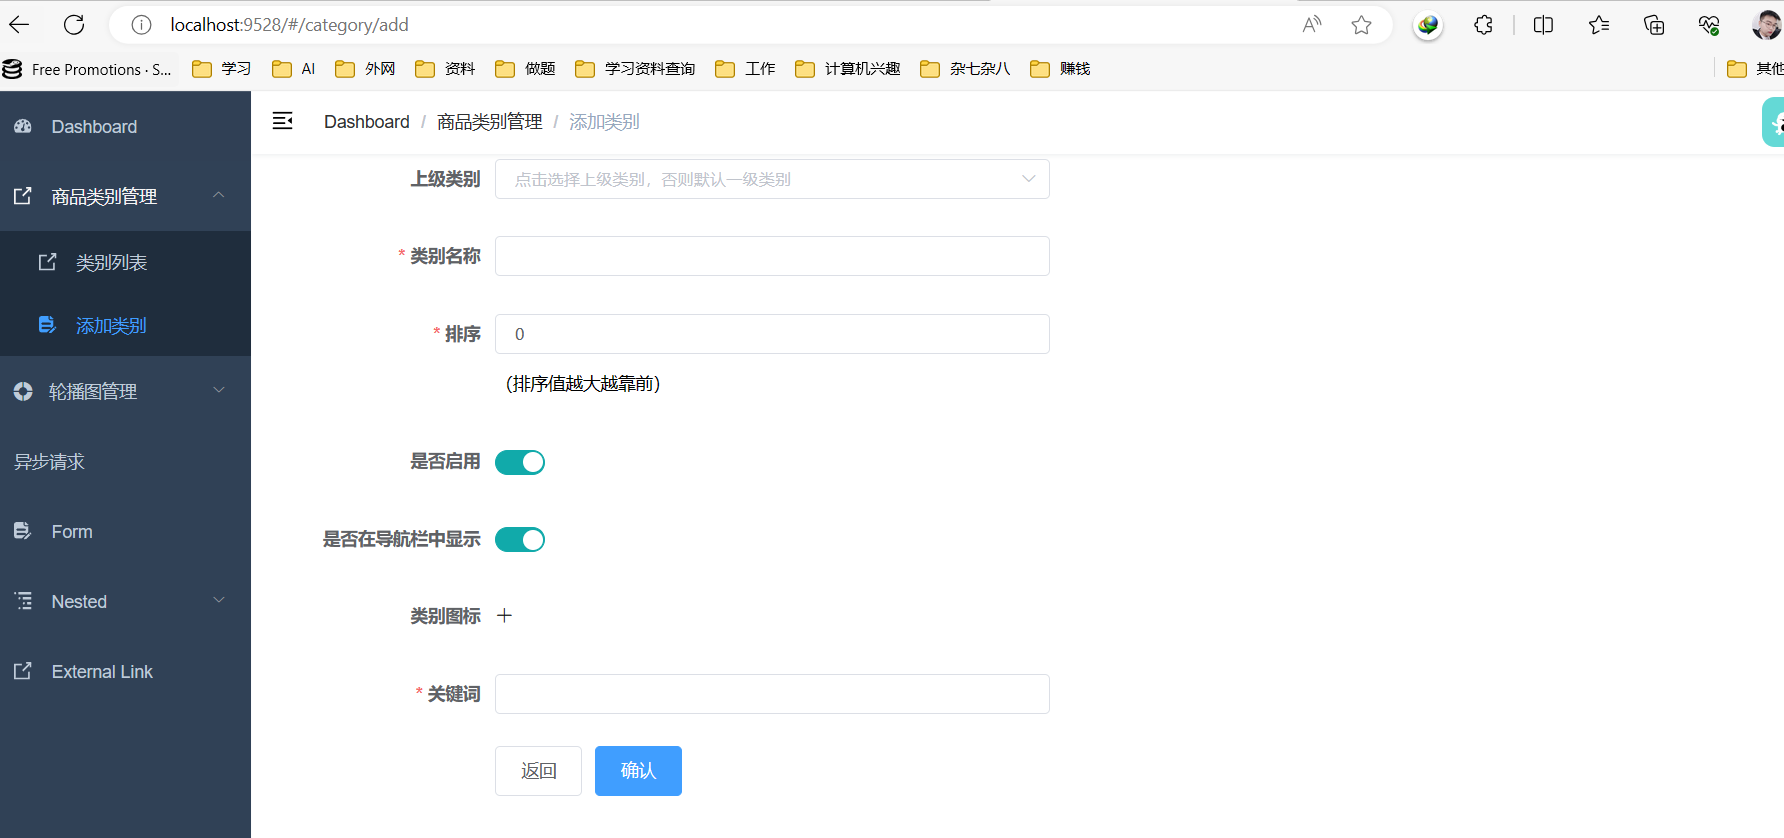
功能具体需求如下:
1、类别名称、排序序号、关键词为必填项,使用Element UI的表单验证规则进行验证。
2、可以不选择上级类别,当不选择上级类别时,parent_id的值为0。
3、上传类别图标功能无需实现,表单中的该项数据提交空字符串即可。
4、点击【返回】时返回类别列表页面。
5、点击【确认】时,先进行必填项的验证,然后提交异步请求。
6、添加成功后,提示类别添加成功,并自动跳转类别列表页面。
实现步骤:
- 开发基础表单页面
- 实现层级菜单展示和选择
- 实现表单提交
- 综合测试
开发基础表单页面
在src/views/product/category文件夹下新建add文件夹,并在该文件夹中声明index.vue,在index.vue中开发基础表单页面。
上级品类菜单项使用el-cascader组件实现层级菜单展示和选择效果
<template>
  <div style="padding: 0 15px">
    <div class="box">
      <el-row>
        <el-col :span="12">
          <el-form
            ref="ruleForm"
            :model="ruleForm"
            :rules="rules"
            label-width="180px"
          >
            <el-form-item label="上级类别" prop="parentId">
              <el-cascader v-model="ruleForm.parent_id" style="width: 100%"
                           placeholder="点击选择上级类别,否则默认一级类别" size="small"
                           :props="props"
              />
            </el-form-item>

            <el-form-item label="类别名称" prop="name">
              <el-input v-model="ruleForm.name" size="small"></el-input>
            </el-form-item>

            <el-form-item label="排序" prop="sort">
              <el-input v-model="ruleForm.sort" size="small"></el-input>
              (排序值越大越靠前)
            </el-form-item>

            <el-form-item label="是否启用" prop="enable">
              <el-switch
                v-model="ruleForm.enable"
                :active-value="1"
                :inactive-value="0"
                active-color="#1aa"
                inactive-color="#aaa"
              />
            </el-form-item>

            <el-form-item label="是否在导航栏中显示" prop="isDisplay">
              <el-switch
                v-model="ruleForm.is_display"
                :active-value="1"
                :inactive-value="0"
                active-color="#1aa"
                inactive-color="#aaa"
              />
            </el-form-item>

            <el-form-item label="类别图标" prop="icon">
              <input v-model="ruleForm.icon" type="hidden"/>
              <el-upload>
                <img v-if="imageUrl" :src="imageUrl" class="avatar" style="width: 130px"/>
                <i v-else class="el-icon-plus"></i>
              </el-upload>
            </el-form-item>

            <el-form-item label="关键词" prop="keywords">
              <el-input v-model="ruleForm.keywords" size="small"></el-input>
            </el-form-item>

            <el-form-item>
              <el-button @click="$router.go(-1)">返回</el-button>
              <el-button type="primary" @click="submitForm('ruleForm')">确认</el-button>
            </el-form-item>
          </el-form>
        </el-col>
      </el-row>
    </div>
  </div>
</template>

<script>
import * as api from '@/api/category'

export default {
  name: 'index',
  data() {
    return {
      imageUrl: '',
      ruleForm: {
        name: '',
        parent_id: [0],
        sort: 0,
        enable: 1,
        is_display: 1,
        icon: '',
        keywords: ''
      },
      rules: {
        name: [{ required: true, message: '请输入类别名称', trigger: 'blur' }],
        sort: [{ required: true, message: '请输入排序序号', trigger: 'blur' }],
        keywords: [{ required: true, message: '请输入关键词', trigger: 'blur' }]
      },
      props: {
        lazy: true, // 懒加载模式
        checkStrictly: true,//可以选择中间类别
        lazyLoad: (node, resolve) => {
          //node 是被选中的节点, resolve 是回调函数,把选择的数据返回给组件
          console.log('选择的节点是:', node)
          let parentId = 0
          //当选择的节点不是根节点 设置parentId为当前节点id
          if (!node.root) {
            parentId = node.data.value
          }
          //加载相应的子类别
          api.queryByParentId(parentId).then((res) => {
            console.log('加载子类别:', res)
            const children = res.data.items
            //定义返回的数据结构 返回的数据[{label:'类别名',value:'类别id'}]
            const nodes = [] //定义数组
            //遍历所有子类别
            children.forEach((category) => {
              //往数组中添加数据
              nodes.push({
                label: category.name,//类别名
                value: category.id, //类别id
                leaf: category.is_parent !== 1 //是否为叶子节点
              })
            })
            console.log('返回的数据结构:', nodes)
            //把数据返回给组件
            resolve(nodes)
          })
        }
      }
    }
  },
  methods: {
    //提交表单
    submitForm(formName) {
      this.$refs[formName].validate((valid) => {
        //验证成功
        if (valid) {
          console.log(this.ruleForm)
          //因为cascader返回的parentId是一个层级数组 ,重置表单中的parentId
          const parentIds = this.ruleForm.parent_id
          console.log(parentIds)
          this.ruleForm.parent_id = parentIds[parentIds.length - 1] //数组的最后一个元素
          this.ruleForm.depth = parentIds.length + 1 //级别

          //添加类别
          api.addCategory(this.ruleForm).then((res) => {
            console.log('添加类别;', res)
            this.$message({
              showClose: true,
              message: '添加类别成功',
              type: 'success'
            })
            this.$router.push({ name: 'Category' }) //添加成功 返回类别列表
          })
        } else {
          console.log('添加类别失败')
          return false
        }
      })
    }
  }
}
</script>

<style scoped>

</style>
添加路由:
{
  path: '/category',
  component: Layout,
  name: 'Category',
  meta: { title: '商品类别管理', icon: 'link' },
  children: [
    {
      path: 'list',
      name: 'CategoryList',
      component: () => import('@/views/product/category/list/index'),
      meta: { title: '类别列表', icon: 'link' }
    },
    {
      path: 'add',
      name: 'AddCategory',
      component: () => import('@/views/product/category/add/index'),
      meta: { title: '添加类别', icon: 'form' }
    }
  ]
}
在category.js里面添加方法:
export function addCategory(data) {
  return request({
    url: `/category/add-new`,
    method: 'post',
    data
  })
}
测试效果:
二、组件的生命周期(了解)
1、组件的生命周期和钩子函数
Vue 2组件的生命周期可以分为8个阶段,每个阶段都有对应的钩子函数,下面是具体的介绍:
- beforeCreate:在Vue实例被创建之初,完成数据的观测和初始化之前调用,此时组件中的data和methods还未被初始化,不能访问到任何数据和方法。
- created:在Vue实例被创建之后,完成数据的观测和初始化之后调用,此时组件中的data和methods已经被初始化,但是DOM还未被渲染。
- beforeMount:在组件DOM挂载到页面前调用,组件的模板已编译完成,但还未生成真实的DOM节点。
- mounted:在组件DOM挂载到页面之后调用,组件已经生成了真实的DOM节点,可以进行DOM操作。
- beforeUpdate:在组件更新之前调用,此时组件的数据已经更新,但是DOM还未被重新渲染。
- updated:在组件更新之后调用,此时组件的数据已经更新,并且DOM已经被重新渲染。
- beforeDestroy:在组件被销毁之前调用,此时组件实例还存在,可以进行一些清理操作。
- destroyed:在组件被销毁之后调用,此时组件实例已经被销毁,所有的事件监听和定时器也已经被移除。
2、钩子函数的应用场景
Vue的生命周期钩子函数在不同的应用场景中可以用于解决各种问题。
1、beforeCreate:
适用场景:在组件实例初始化之前,通常用于执行一些配置、数据初始化或全局事件注册。
示例:在这个阶段可以设置初始数据、获取应用程序配置信息等。
2、created:
适用场景:在组件实例已经创建完成,但还未挂载到 DOM 之前,通常用于数据获取、异步操作等。
示例:在这个阶段可以发送 AJAX 请求获取数据,然后更新组件的状态。
3、beforeMount:
适用场景:在模板编译之前被调用,用于执行一些准备工作。
示例:可以在这个阶段进行一些模板编译前的数据处理。
4、mounted:
适用场景:在组件已经挂载到 DOM 后被调用,通常用于访问 DOM 元素、执行一次性操作或与第三方库集成。
示例:可以在这个阶段执行初始化第三方插件、添加事件监听器或进行 DOM 操作。
5、beforeUpdate:
适用场景:在数据更新之前被调用,不会触发首次渲染。
示例:可以在这个阶段进行数据比较,以决定是否触发更新操作。
6、updated:
适用场景:在数据更新后被调用,不会触发首次渲染。
示例:可以在这个阶段执行一些与数据更新相关的操作,例如重新计算或重新渲染。
7、beforeDestroy:
适用场景:在组件销毁之前被调用,通常用于清理工作、取消事件监听器、销毁定时器等。
示例:可以在这个阶段进行资源释放、取消订阅或清理定时器,以避免内存泄漏。
8、destroyed:
适用场景:在组件销毁完成后被调用,事件监听器和子组件已被销毁。
示例:可以在这个阶段执行一些最后的清理工作,如释放资源、断开连接等。
